Autotune has become an integral part of modern vocal production, so much so that its absence is often noticeable in tracks. Fortunately, as time has progressed, autotune has become increasingly affordable and user-friendly, allowing for effortless application to vocal tracks. With careful subtlety, it can be used to ensure vocals remain perfectly in key.
In this comprehensive FL Studio guide, you’ll gain the expertise to effectively utilize autotune, enhancing vocal precision to new heights. Whether you’re a seasoned producer or just starting out, this tutorial will equip you with the skills to quickly and skillfully apply the autotune effect to any vocal samples, elevating your tracks to a whole new level of professionalism.
Is Autotune Available in FL Studio?
Autotuning in FL Studio offers a range of options, including the primary native VST plugin, NewTone, and the Pitcher plugin. These powerful tools enhance the pitch of vocal samples and provide precise control over the autotune effect. NewTone stands out as an exceptional solution, offering visual feedback and intuitive controls for refining pitch. With its user-friendly interface, achieving the desired autotune effect becomes effortless and efficient. Whether you’re a beginner or an experienced producer, NewTone empowers you to create professional-sounding vocals.
In addition to NewTone, FL Studio also provides Pitcher, another autotune plugin. Pitcher specializes in real-time pitch correction, making it ideal for on-the-fly adjustments during recording or live performances. It expands your creative possibilities, allowing you to fine-tune vocals with ease and deliver captivating performances. With these autotuning options in FL Studio, you have the tools to shape and perfect your vocal tracks, ensuring that your music stands out with precision and professionalism.
Mastering Autotune with NewTone in FL Studio
When it comes to autotuning vocals in FL Studio, many users favor the native plugin known as NewTone. However, it’s important to note that NewTone is designed for manipulating pre-recorded audio and samples rather than real-time vocal recording sessions.
Nevertheless, NewTone offers an exceptional degree of control and versatility when it comes to modifying vocal samples. With its extensive array of tools, users can finely adjust the autotune effect to their exact preferences, surpassing the capabilities of numerous other similar VST plugins.
Step 1 – Launching NewTone and Importing Audio
To get started, you’ll first need to open a new instance of NewTone on a mixer track. Access the mixer view and choose the specific mixer track you want to use. Then, click on an empty insert slot within that track.
In the drop-down menu, navigate to the ‘Misc’ section where you’ll find NewTone. Simply click on NewTone to open a fresh instance of the plugin.
Once NewTone is open, you can easily drag and drop the desired audio directly into the plugin window. As you perform this action, the audio will be automatically sliced and assigned to corresponding notes within NewTone.
Step 2 – Fine-tuning the Vocal
After importing the audio into NewTone, you have the flexibility to manipulate it in various ways. At the top right corner, you’ll notice three knobs labeled ‘Center,’ ‘Variation,’ and ‘Trans.’
- Center:
The ‘Center’ knob determines the proximity of the vocal to the desired note. Increasing this value produces a more pronounced autotuned effect.
- Variation:
Similarly, the ‘Variation’ knob controls the pitch variation when hitting a note. Higher values reduce pitch variations, resulting in a more robotic-sounding voice.
- Trans:
The ‘Trans’ knob, short for ‘transient,’ influences the transition between notes. Higher values introduce more natural variations during note transitions.
By adjusting these three knobs, you can customize the autotune sound to your preferences. Another remarkable feature of NewTone is the ability to click and drag specific portions of the sample to different notes. This allows for selective pitch correction, enabling you to apply autotune to specific vocal elements while preserving the original character of others.
Step 3 – Exporting the Edited Audio
After applying the desired autotune effect using NewTone, the next step is to export the edited audio for use in your project.
To accomplish this, you can utilize the four export options conveniently located on the right side of the main toolbar in NewTone.
These export options include:
- Copy the MIDI: This function enables you to duplicate the MIDI data linked to the edited audio, allowing you to manipulate the notes further or use them with different instruments.
- Save As: Opting for this choice permits you to save the edited audio as a distinct file while preserving the applied autotune effect. This is ideal when you want to maintain a version with the autotuned vocals intact.
- Drag Selection: By selecting this option, you can effortlessly drag and drop the chosen portion of the edited audio onto the playlist or any other desired location in FL Studio. This simplifies the process of arranging and conducting further edits.
- Send to the Playlist: This option promptly sends the edited audio to the playlist, ensuring it is readily available for additional arrangement and mixing within your project.
Choose the export option that best suits your specific needs and workflow. Each option serves a particular purpose and can be applied in different contexts.
Using Pitcher for Autotuning
Pitcher is another powerful native plugin within FL Studio that focuses on real-time pitch correction, making it ideal for immediate adjustments during recording or live performances.
- Step 1 – Opening Pitcher
To get started, make sure you add Pitcher to the mixer track where you want to apply the autotune effect to the vocals. Access the effects slots on the mixer channel and choose Pitcher from the list of available options.
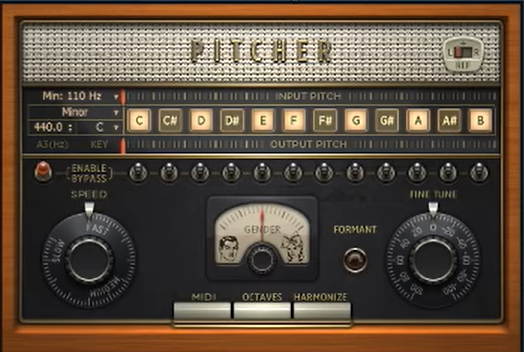
- Step 2 – Using Pitcher
Once Pitcher is open, you will immediately hear the effect when playing the vocals through the associated mixer channel. It’s beneficial to know the key of your vocal or the desired key you want to achieve, as it helps ensure precise pitch correction.
Pitcher provides a wealth of options for fine-tuning your autotune effect, allowing you to customize the pitch correction to your exact preferences. In addition to individually selecting the allowed notes for the vocal, Pitcher empowers you to activate or deactivate specific notes within the autotune effect, providing complete control over the pitch correction process.
Furthermore, Pitcher offers adjustable pitch speed through a dedicated dial on the left side. This feature enables you to modify the speed at which the pitch correction occurs, allowing for seamless transitions and tailored effects. On the right side, the dial for fine-tuning the pitch of the vocal gives you precise control over the pitch adjustment, enabling you to achieve the desired level of correction or artistic expression.
By experimenting with these settings in Pitcher, you can unlock a world of possibilities for precise and real-time autotuning. Whether you aim for subtle pitch refinement or bold vocal transformations, Pitcher’s versatility empowers you to mold the sound to match your creative vision and achieve the perfect autotuned result.
The Popularity of Autotune
Autotune has gained immense popularity, primarily due to its exceptional capability to refine vocals and achieve pitch-perfection, irrespective of the original recording quality. Its widespread usage across various genres has solidified its position as one of the most ubiquitous effects in the arsenal of music producers worldwide.
Autotune’s ability to effortlessly correct pitch-related imperfections in vocals has revolutionized the music industry. With its advanced algorithms and intuitive controls, it empowers artists to achieve impeccable vocal performances that captivate listeners. Whether it’s enhancing a singer’s natural abilities or pushing the boundaries of vocal manipulation, autotune has become an indispensable tool for both seasoned professionals and aspiring musicians.
Beyond its pitch-correction prowess, autotune has permeated diverse musical landscapes, making its presence felt in a wide range of genres. From pop to hip-hop, R&B to electronic, autotune’s versatility knows no bounds. Its ability to transform and elevate vocal performances has reshaped the sound of contemporary music, creating a signature effect that has become synonymous with modern production.
The widespread adoption of autotune by music producers can be attributed to its accessibility and user-friendly nature. With advancements in technology, autotune plugins have become readily available, allowing artists of all levels to tap into its transformative power. As a result, autotune has democratized the creation process, enabling musicians to realize their artistic vision without the constraints of vocal limitations.
Conclusion
By mastering the application of autotune using the native NewTone and Pitcher plugins in FL Studio, you gain the ability to effortlessly add an autotune effect to your tracks. Acquiring these skills is invaluable for music producers, as autotune is a highly popular and widely used effect in modern music production. By familiarizing yourself with autotuning techniques, you can enhance the overall quality and appeal of your productions. With precise pitch correction and seamless vocal tuning, you can elevate your music to match the standards of contemporary sound. Understanding how to effectively utilize autotune empowers you to create professional-sounding vocals, refine the pitch of your recordings, and explore unique artistic possibilities. By incorporating autotune into your productions, you can take your music to the next level and captivate listeners with a polished and modern sound.
By following these steps and honing your autotuning skills, you gain a valuable tool in your music production arsenal, ensuring that your tracks stand out and resonate with audiences in today’s competitive music landscape.