Music production is an art, and sampling is a crucial tool in the artist’s kit. FL Studio, with its powerful sampling features, offers a creative sandbox for producers, whether they are just getting started or are seasoned experts. This comprehensive guide will delve into the nuanced process of sampling in FL Studio, covering everything from basic principles to advanced techniques.
Before we dive into the hands-on steps of sampling, it’s important to first establish a clear understanding of what sampling entails. In music production, a sample refers to a segment of sound that is used in a different piece of music. It can be as short as a single drum hit or as long as an entire melody. Samples can be derived from numerous sources, including recorded sounds, pre-existing songs, and commercially available sample packs.
FL Studio treats samples as individual channels, meaning each sample is represented as a separate entity within the Channel Rack. This setup gives users the flexibility to manipulate and arrange samples freely.
Choosing and Importing Samples
The process of sampling starts with selecting the appropriate samples to use. Here are three primary sources of samples:
- Original recordings: Users can record their own sounds using microphones, instruments, or synthesizers;
- Personal libraries: Producers often amass collections of sounds that they’ve created, found, or purchased over time;
- Online libraries: There are numerous websites that offer a wide array of samples for purchase or free download.
After obtaining the desired samples, the next step is importing them into FL Studio, which is a simple process:
- Open the browser window by going to View > Browser.
- Navigate to the directory where the samples are stored.
- Drag and drop the sample from the browser into the Channel Rack or Playlist.
Basic Manipulation of Samples
Upon successful importation, the samples can now be manipulated to fit the requirements of the project. Click on the sample in the Channel Rack to open the Channel Settings window. This window houses the controls for the basic properties of the sample:
- Pitch: The pitch knob adjusts the pitch of the sample without affecting its length. Turning the knob to the left lowers the pitch, while turning it to the right raises it;
- Time-stretching: This control changes the length of the sample without altering its pitch. The multiplier to the right of the knob adjusts the time-stretching incrementally, while the knob itself allows for more drastic changes;
- Volume: This knob adjusts the overall loudness of the sample. Remember that increasing the volume too much may result in digital clipping, which is generally undesirable.
Advanced Sample Manipulation Techniques
To truly unlock the creative potential of samples, producers can explore the advanced manipulation techniques available in FL Studio, including chopping, looping, and utilizing plugins.
Chopping Samples
Chopping involves dividing a sample into smaller segments to use and manipulate independently. This technique allows for more detailed control and creative flexibility:
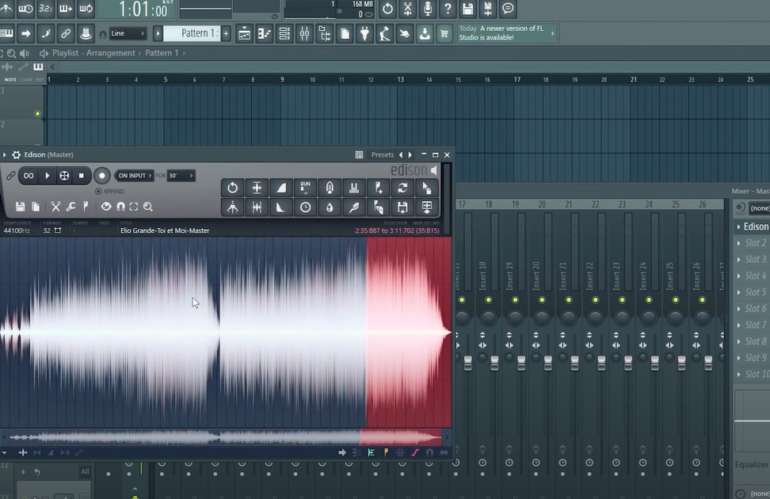
- Drag the sample into Edison (View > Plugin Picker > Edison);
- Use the selection tool (the icon with an “I” and a dotted square) to highlight a portion of the sample you want to chop;
- Click the scissor icon to cut the selection. Alternatively, you can use the floppy disk icon to save the selected segment as a new sample;
- Repeat the process for each part of the sample you want to chop.
Looping Samples
Looping is the process of repeating a specific section of a sample continuously:
- In the Channel Settings window, click on the “Use loop points” button. This button is represented by a circular arrow;
- Adjust the loop points in the sample waveform window. The beginning and end of the loop are marked by flags on the waveform;
- Use the “Crossfade” knob to create a smooth transition between the end and beginning of the loop. The crossfade function gradually decreases the volume at the end of the loop while simultaneously increasing the volume at the start of the loop.
Sampling with Plugins in FL Studio

FL Studio features several plugins designed specifically for handling and manipulating samples, including DirectWave and Fruity Slicer.
DirectWave
DirectWave is a comprehensive sampler plugin that allows for the creation of multi-sampled instruments:
- Open DirectWave by going to Channel > Add one > DirectWave;
- Click on the “Zone” tab. This is where you’ll drop your samples;
- Drag and drop your samples onto the keyboard at the bottom of the plugin. Each sample will be assigned to a key, forming a custom instrument.
Fruity Slicer
Fruity Slicer is a handy tool that automatically chops samples into smaller slices that can be rearranged:
- Drag a sample onto the Fruity Slicer by going to Channel > Add one > Fruity Slicer;
- Use the “Declick in/out” knobs to remove any unwanted clicks or pops at the beginning and end of slices;
- Rearrange the slices in the Piano Roll by drawing notes. Each note corresponds to a different slice, allowing for unique patterns and structures.
Advanced Tips and Tricks
To further enhance your sampling prowess, consider these additional tips:
- Using Envelopes: The envelope tool in the Channel Settings window allows for intricate control over the volume, pitch, and panning of a sample over time. By manipulating these parameters, you can create dynamic and evolving sounds. The envelope tool typically consists of attack, decay, sustain, and release (ADSR) parameters. Here’s how each parameter affects the sample:
| Parameter | Description |
|---|---|
| Attack | Determines how quickly the volume or pitch reaches its maximum level after the sample is triggered. A shorter attack time creates a sharper, more immediate sound, while a longer attack time creates a gradual fade-in effect. |
| Decay | Controls the time it takes for the volume or pitch to reach the sustain level after the attack phase. Adjusting the decay time allows you to shape the overall contour of the sound. |
| Sustain | Sets the level at which the volume or pitch remains after the attack and decay phases. You can sustain the sound at a constant level or have it gradually decay or fade out. |
| Release | Determines the time it takes for the sound to fade out after the sample is released. A shorter release time creates a quick fade-out, while a longer release time allows the sound to linger. |
By carefully adjusting these envelope parameters, you can create expressive and evolving sounds that add depth and character to your samples.
- Layering Samples: Another technique to explore is layering different samples to create new, complex sounds. Layering is particularly useful for drum sounds, where combining multiple samples can add depth, impact, and variation to your beats. Here’s how you can approach sample layering:
| Step | Description |
|---|---|
| Choose a selection of samples | Select samples that complement each other in terms of frequency content and character. For example, layering a deep kick drum sample with a higher-pitched snare drum sample. This creates a more powerful and full-bodied drum sound. |
| Align the samples in time | Ensure that the transients (the initial attack portion of the sound) of the layered samples coincide. This alignment helps the layers blend together seamlessly and prevents phase cancellation issues. |
| Adjust the relative volume levels | Set the appropriate volume levels for each layer to achieve the desired balance and tonal characteristics. Experiment with different combinations and layering techniques to discover unique and interesting results. |
By layering samples effectively, you can create rich and textured sounds that go beyond what a single sample can achieve.
- Automation: Automating parameters can add motion and interest to a static sample. Most digital audio workstations (DAWs) provide automation features that allow you to control various parameters over time. Here are some examples of parameters you can automate:
| Parameter | Description |
|---|---|
| Volume | Automating the volume level can create dynamic changes in intensity throughout a sample. This technique is commonly used to shape the energy and dynamics of a track. |
| Pitch | Automating the pitch can introduce subtle or drastic changes to the tonality of a sample. This can be useful for creating tension, adding variation, or achieving melodic effects. |
| Effect settings | Many effects, such as reverb, delay, or filter cutoff, have parameters that can be automated. Automating these parameters can add evolving textures and spatial effects to your samples. |
Here is a video you can watch for a detailed guide on sampling in FL Studio:
How to Sample in FL Studio *beginner tutorial*
How to Sample in FL Studio 20 (EVERYTHING YOU NEED TO KNOW)
Conclusion
FL Studio’s sampling features offer incredible depth and versatility, allowing music producers to create unique sounds and musical elements. With practice and experimentation, you can master these techniques to enhance your productions and express your creativity.
FAQ
In the Channel Settings window, click on the “Normalize” button. Normalizing raises the level of the sample so that its loudest point reaches the maximum volume.
Legally, you need permission from the copyright holder to use samples from copyrighted material. Failing to do so could lead to legal repercussions.
FL Studio does not support video files directly. However, you can use third-party software to extract audio from the video file, which you can then import as a sample.
In the Channel Settings window, you can adjust the time knob to time-stretch the sample without affecting its pitch.
Yes, you can. Apply a reverb effect to your sample, bounce it out, and then reverse it in the Channel Settings window.