If you’re a music producer or enthusiast using FL Studio, you may be interested in expanding its capabilities by adding plugins. Plugins are additional software components that can enhance the functionality and sound of your FL Studio setup. In this step-by-step guide, we’ll walk you through the process of adding plugins to FL Studio, so you can take your music production to the next level.
Finding and Choosing Plugins
Adding plugins starts with finding the right ones for your needs. Here’s how to get started:
- Research: Take some time to explore different plugin options available online. Look for reputable websites and read user reviews to get an idea of their quality and usefulness;
- Compatibility: Before downloading any plugins, ensure they are compatible with your version of FL Studio. Check the plugin’s system requirements and FL Studio version compatibility information on the manufacturer’s website;
- Demo Versions: Many plugins offer demo or trial versions. Consider trying out these demos to get a feel for the plugin’s features and compatibility with FL Studio before making a purchase;
- Popular Choices: Some popular plugin categories to consider include synthesizers, effects processors, samplers, and mastering tools. However, the choice ultimately depends on your specific needs and musical style.
Downloading and Installing Plugins
Once you’ve chosen the plugins you want to add, it’s time to download and install them. Follow these steps:
- Download: Visit the plugin manufacturer’s website and locate the download page for the desired plugin. Click on the appropriate link to start the download process;
- Installation: After the download is complete, locate the installer file on your computer and run it. Follow the on-screen instructions provided by the installer to complete the installation process. Make sure to select the correct installation path for FL Studio;
- Plugin Formats: FL Studio supports various plugin formats, including VST, VST3, and AU. Make sure to download the plugin version that matches your FL Studio installation. If you’re unsure, consult the plugin’s documentation or website for guidance.
Activating Plugins in FL Studio
Once you’ve successfully installed the plugins, it’s time to activate them within FL Studio. Here’s what you need to do:
- Launch FL Studio: Open FL Studio on your computer;
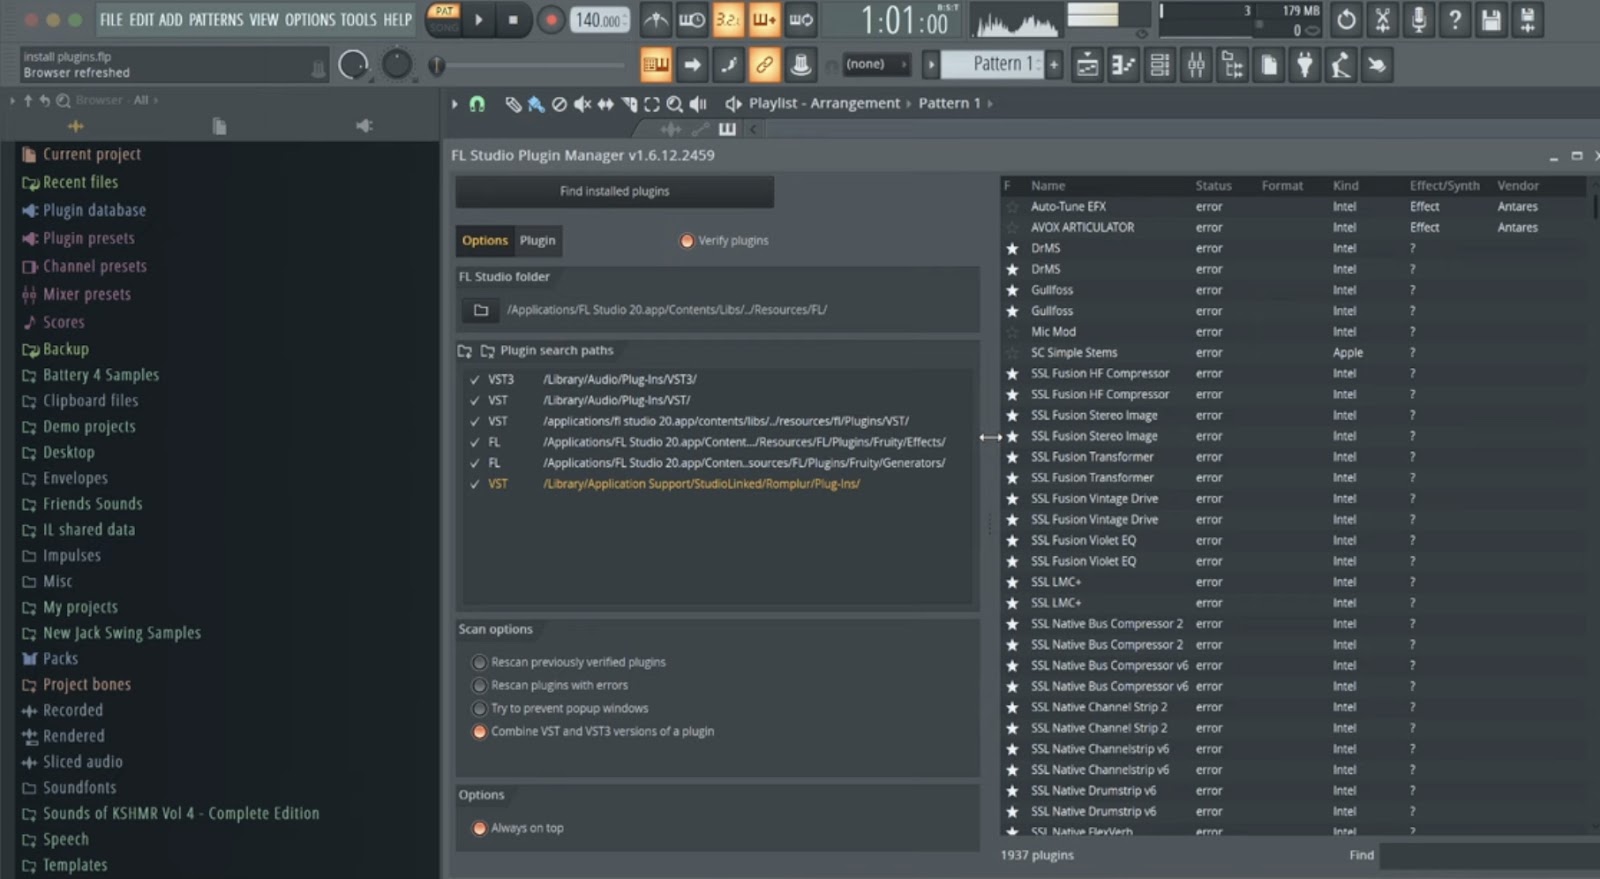
- Plugin Manager: In the FL Studio menu, click on “Options” and select “Manage Plugins” from the dropdown menu. This will open the Plugin Manager window;
- Scanning for Plugins: In the Plugin Manager, click on the “Start scan” button. FL Studio will scan your computer for installed plugins and display them in the Plugin Manager window;
- Plugin Selection: Tick the checkboxes next to the plugins you want to activate in FL Studio. You can also organize them into folders or categories for easy access;
- Close the Plugin Manager: Once you’ve selected the plugins, close the Plugin Manager window. The activated plugins will now be available within FL Studio.
Now that your plugins are activated, you can start exploring their features and incorporating them into your music production workflow. Here are a few tips to help you make the most of your activated plugins:
- Explore Presets: Many plugins come with a variety of presets that can serve as a great starting point for your tracks. Take some time to browse through the available presets and experiment with different sounds;
- Customize and Save Settings: Once you’ve found a plugin preset or made adjustments to its parameters, consider saving your settings as a custom preset. This allows you to easily recall your favorite settings later or use them as a basis for future projects;
- Combine Multiple Plugins: FL Studio allows you to use multiple plugins simultaneously. Don’t be afraid to experiment with layering different sounds and effects from various plugins to create unique and complex sounds;
- Learn the Plugin Controls: Take the time to understand the functions and controls of each activated plugin. Read the documentation or watch tutorial videos to learn about their capabilities and how they can be used to achieve different sonic results;
- Experiment and Have Fun: Music production is all about experimentation and creativity. Use your activated plugins as tools to explore new sounds, genres, and techniques. Don’t be afraid to try something unconventional or push the boundaries of traditional sound design.
Remember, the process of activating and using plugins is just the beginning. As you gain experience and confidence, continue to expand your plugin collection, explore new releases, and stay up-to-date with the latest advancements in music production technology. With dedication and a passion for your craft, you can create incredible music with the help of your activated plugins in FL Studio.
Using Plugins in FL Studio
With your plugins successfully added and activated in FL Studio, it’s time to start using them in your music production. Here are some basic steps to get you started:
- Choose the right plugin: With a wide array of plugins at your disposal, it’s important to select the one that suits your specific needs. Whether you’re looking for a synthesizer, a sampler, or an effect plugin, take the time to explore the options and find the one that aligns with your creative vision;
- Load the plugin onto a channel: In FL Studio, you can add plugins to individual mixer channels or directly onto the Step Sequencer. Simply right-click on the desired channel, select “Insert,” and choose your plugin from the list. Alternatively, you can drag and drop the plugin onto the Step Sequencer to assign it to a specific pattern;
- Configure the plugin: Once the plugin is loaded, spend some time familiarizing yourself with its interface and controls. Adjust parameters such as oscillators, filters, envelopes, and effects to shape the sound to your liking. Each plugin will have its own unique set of controls, so don’t be afraid to experiment and explore;
- Create melodies and patterns: Now that your plugin is ready, it’s time to start composing. Use the Step Sequencer or Piano Roll to create melodies, chords, and drum patterns. Take advantage of the plugin’s features to add depth and complexity to your compositions;
- Automate parameters: Automation allows you to modulate various parameters of the plugin over time. FL Studio provides intuitive automation tools that enable you to create dynamic changes in your sounds. Experiment with automating parameters like cutoff, resonance, modulation depth, or effect parameters to add movement and interest to your tracks;
- Mix and master: As you progress with your music production, it’s crucial to pay attention to the mix and master. Plugins can be instrumental in shaping and polishing your final sound. Utilize EQ plugins to sculpt the frequency balance, compression plugins to control dynamics, and reverb and delay plugins to create depth and space.
Remember, these steps are just a starting point. As you gain more experience and confidence, don’t be afraid to explore advanced techniques, combine multiple plugins, and develop your own unique workflows. The journey of music production is a constant learning process, so keep experimenting, refining your skills, and pushing the boundaries of your creativity. Enjoy the process and happy producing!
Conclusion
Adding plugins to FL Studio opens up a world of possibilities for music production. These plugins can enhance your creativity, expand your sonic palette, and help you achieve professional-level results. By following this step-by-step guide, you should now have a good understanding of how to find, download, install, activate, and use plugins within FL Studio.
Once you start exploring the vast world of plugins, you’ll discover a wide range of options to suit your musical style and needs. From virtual instruments that emulate classic analog synths to effects processors that add depth and character to your sounds, the choices are virtually endless. Experimenting with different plugins and their settings can lead to unique and innovative sounds that set your music apart.
Keep in mind that while plugins can greatly enhance your music production workflow, it’s important to strike a balance and not get overwhelmed by the sheer number of options available. Start with a few essential plugins and gradually expand your collection as you become more familiar with their capabilities.
Remember, the key to successful music production lies in combining technical knowledge with creative expression. Use the tools and plugins at your disposal to bring your musical ideas to life and let your creativity flow. With dedication, practice, and the right plugins, you can take your music production skills to new heights. So, dive into the world of plugins, explore their possibilities, and embark on an exciting journey of musical discovery. Happy producing!