Discover the boundless capabilities of FL Studio, a remarkable digital audio workstation (DAW) embraced worldwide for unleashing musical creativity. Step into a realm where MIDI (Musical Instrument Digital Interface) files come to life, infusing soul into synthesizers, drum machines, DAWs, and other electronic musical marvels. Embark on an immersive journey as we delve into the intricate realm of importing MIDI files into FL Studio, meticulously unraveling every intricate detail awaiting your exploration.
The Basics of MIDI Files
MIDI files hold the power to dictate the pitch, duration, key velocity, pitch bend, modulation, and instrument selection, breathing life into melodies. Within the MIDI landscape, two distinct types reign supreme: Type 0 and Type 1. Type 0 MIDI files encapsulate the entire composition’s commands within a single track, while Type 1 MIDI files harbor the ability to house multiple tracks. Each track manifests commands for a unique instrument or a specific section of the same instrument. Embrace FL Studio’s unwavering support for both MIDI file types, paving the way for limitless musical exploration.
Step-by-Step Guide to Importing MIDI Files
Step 1: Procuring the MIDI File
First and foremost, you need a MIDI file to import into FL Studio. MIDI files can be created in various ways, including:
- Composing in a DAW: You can create a MIDI file by composing directly in a DAW using a MIDI controller, such as a keyboard or drum pad;
- Converting sheet music: Several software programs can convert scanned sheet music into MIDI files;
- Downloading from the Internet: Numerous websites offer free or paid MIDI files for download. Ensure that the files are high quality and obtained legally.
Remember to store the MIDI file in a known location on your computer for easy retrieval.
Step 2: Launching FL Studio
Next, launch the FL Studio application on your device. It’s important to ensure that you are using the latest version of FL Studio. This can be confirmed by checking the “About” section under the “Help” menu.
Step 3: Opening the Import Dialog
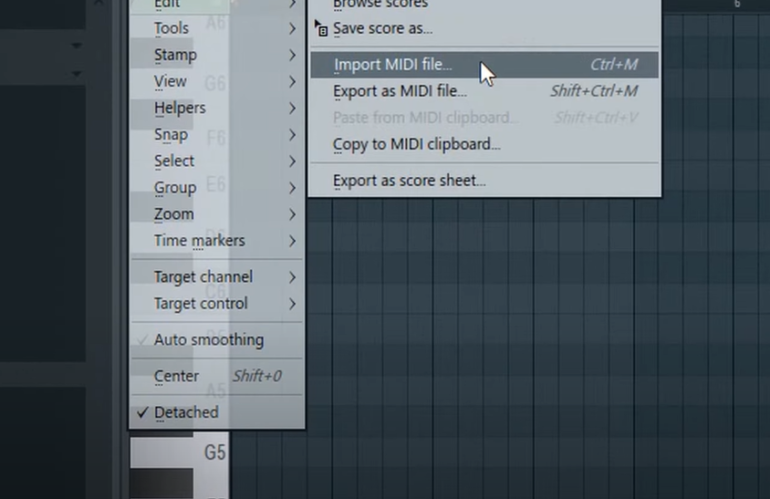
With FL Studio open, navigate to the menu bar at the top left corner of the screen. Here, you’ll see various options such as “File,” “Edit,” “Add,” among others. Click on “File,” and a dropdown menu will appear with several options.
In this dropdown menu, locate and click on “Import.” Another submenu will appear. From this submenu, select “MIDI file…”
Step 4: Choosing the MIDI File
Upon clicking “MIDI file…”, a new window will appear where you can browse through your device’s directory.
Use the browsing window to locate the directory in which your MIDI file is stored. Once you locate the file, click on it to select it. Then, click on the “Open” button at the bottom right corner of the window.
Step 5: MIDI File Importation
Once the “Open” button is clicked, FL Studio will import the MIDI file.
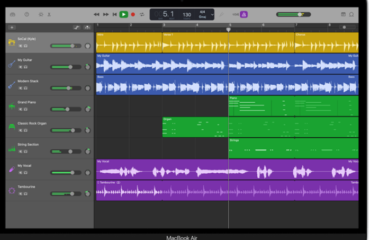
The software reads the MIDI data and converts it into its native format. It creates a new pattern in the Channel Rack for every track in the MIDI file, and populates the Piano Roll with the notes of each instrument. Furthermore, the Playlist displays the arrangement of the whole composition, and you can start editing and mixing right away.
If the MIDI file contains any controller or system exclusive data, FL Studio will translate these into appropriate automation events.
Detailed Look at MIDI Import Options

After selecting your MIDI file for import, a pop-up titled “MIDI Import Options” will appear. This window presents you with several options to control the specifics of how the MIDI data will be interpreted by FL Studio. Understanding these options will help you make the most out of your MIDI file:
- Import Time Signatures: This setting allows FL Studio to interpret the time signature of the original MIDI file. If the option is enabled, the DAW will retain the original time signature, which can be especially useful when working with complex compositions;
- Align all time signatures: This option can help keep your project organized. If your MIDI file has changes in the time signature throughout the composition, enabling this option will align all time signatures with the bars in FL Studio’s project;
- Create one channel per track: This option will instruct FL Studio to create a unique pattern for each track in the MIDI file. This can significantly simplify the process of editing and organizing your project;
- Import into playlist: If you enable this option, FL Studio will place the MIDI data into the Playlist window. This provides a visual representation of your composition, making it easier to arrange and edit;
- Import into step sequencer: Enabling this option will import your MIDI data into the Step Sequencer, providing another method of visualizing and manipulating your music;
- Create a new project: If you want to import the MIDI file into a clean environment, choose this option. FL Studio will open a new project window and import your MIDI data there;
- Fit to tempo: This option will adjust the tempo of the imported MIDI file to match the current project tempo.
Import Options Table
| Option | Description |
|---|---|
| Import Time Signatures | Retains the original time signature |
| Align all time signatures | Aligns time signatures with FL Studio bars |
| Create one channel per track | Creates a unique pattern for each MIDI track |
| Import into playlist | Places MIDI data into the Playlist window |
| Import into step sequencer | Imports MIDI data into the Step Sequencer |
| Create a new project | Imports MIDI file into a new project |
| Fit to tempo | Adjusts MIDI file tempo to match project tempo |
Further Tips for Working with MIDI Files in FL Studio
Once you’ve successfully imported your MIDI file, here are a few tips to help you navigate through the next steps:
- Examine the Imported MIDI Data: Spend some time familiarizing yourself with the imported MIDI data in the Channel Rack, Piano Roll, and Playlist. Understanding the layout of your project will be beneficial when it comes to arranging and editing;
- Modify the Project as Needed: Feel free to adjust the tempo, pitch, or other parameters of the imported MIDI data to suit your needs. FL Studio provides extensive editing capabilities that you can utilize;
- Use the Mixer for Further Refinements: Use FL Studio’s Mixer to apply effects, adjust levels, and perform other mixdown tasks;
- Save Your Project Regularly: Don’t forget to save your project often to prevent any loss of work;
- Export Your Project: Once you’re satisfied with your project, you can export it in various formats such as MP3, WAV, or OGG.
To visualize the entire process of importing MIDI files into FL Studio, check out this detailed walkthrough video here:
How To Export & Import MIDI Files in FL Studio 20
Importing Midi Files and Samples, FL Studio Tutorial
Conclusion
Importing MIDI files into FL Studio can open up a world of possibilities for your music production. You can manipulate existing compositions, collaborate with other musicians, and even find inspiration from the vast array of MIDI files available online. Understanding the specifics of this process and knowing how to customize the MIDI data within FL Studio will help you push your creative boundaries and produce music that truly stands out.
Whether you are a beginner or a seasoned professional, this guide offers a thorough understanding of the process of importing MIDI files into FL Studio. Now, you can explore new musical dimensions and use these instructions to enhance your workflow and your music production abilities.
FAQ
Check the channel settings. Sometimes, FL Studio assigns the MIDI data to a general MIDI set that might not match the sounds intended for the composition. You may need to assign the MIDI data to the correct plugins or samples manually.
FL Studio currently only supports the importation of one MIDI file at a time.
Yes, you can export your FLStudio compositions as MIDI files. This can be done through the “Export” option in the “File” menu.
A MIDI file carries information that instructs a musical instrument on how to play a piece of music. This includes data like pitch, velocity, key pressure, control signals for parameters such as volume, vibrato, audio panning, cues, and clock signals that set and synchronize tempo between multiple devices.